As an HDR photography instructor, I always tell my students: a tripod gives you the sharpest, most stable HDR images. But in real‑world shoots a tripod isn’t always an option. Whether you’re inside a museum where they forbid them, traveling light, or stuck in a crowded scene, you may need to shoot handheld. This article is all about how to pull off HDR handheld — and get great results even when you’ve got no tripod.
TL/DR: If you can’t use a tripod, you can still shoot HDR with good results by following a handful of key rules. Set up auto‑exposure bracketing (AEB), lock aperture, keep ISO low, brace your body, shoot fast, adjust exposure compensation, always take a backup set, review sharpness on‑site, and clean up noise later in post. With attention to each of these, you’ll greatly improve your handheld HDR work.
In May of 2011, I traveled to Turkey on a tour. I took a small tripod with me (called a Gorillapod – sometimes you can get away with this guy where a regular one isn’t allowed, plus it’s small to carry) and a backpack that with a clip to hold it on the outside.
I was all set for some great HDR images in some historic places – or so I thought!
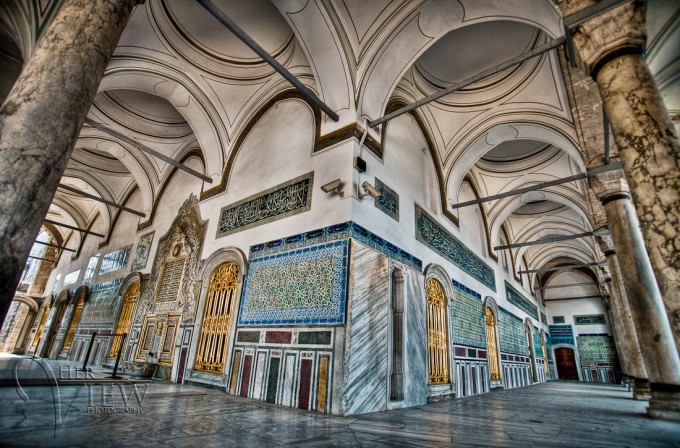
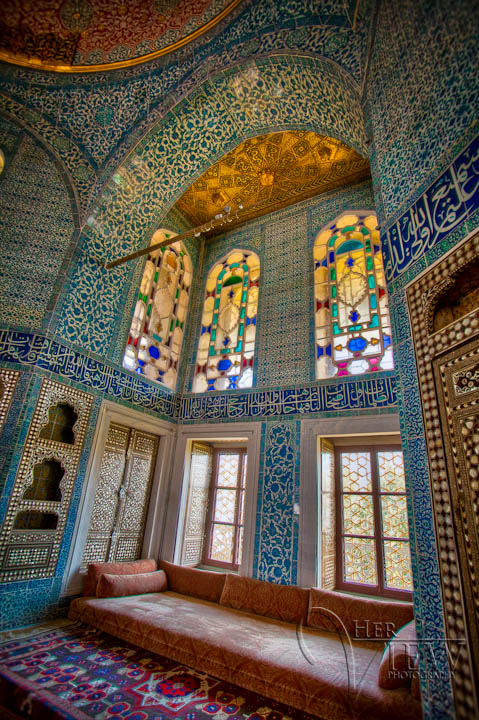
One of the first locations we visited was the Topkapi Palace in Istanbul. As I passed through the entry gate, security confiscated my tripod and told me I could retrieve it upon exiting the palace grounds. So, on to plan B – shooting hand-held.
I was a bit disappointed, it was also a major pain in the butt getting my tripod back and I almost lost my tour group as I had to go back around to the entry gate, while we were all meeting at the exit.
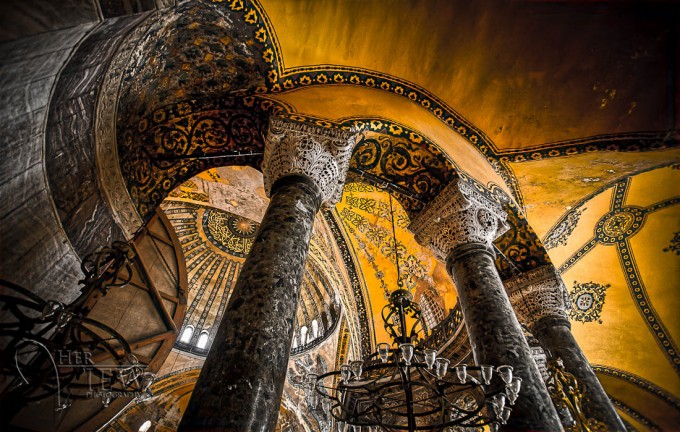
Fast forward to Hagia Sofia mosque, I thought I’d try again to get the tripod inside. Ha! Sometimes I feel like somebody’s got it out for us photographers, you know? Can you cut us a break please!? Needless to say, they took it again and I had a repeat performance of running out the exit, squishing out past everyone else – running around back to the front, pushing my way through what seemed like a thousand people in line, to the entrance security booth only to discover that there, they move them to the exit for you.
You’ve got to be kidding me! Argh!
By the time I convinced the security guy at the exit to let me back in that way and got my tripod I really had to hoof it back to my group.
Sweaty again. Time for a new plan.
What follows are some of the steps and settings I use to get the best results when I have to shoot without my tripod, which as you can see, happens quite often.
There are several reasons why you might have to use these tips and shoot handheld.
- Tripod use is often restricted or forbidden in some museums, churches, and other venues
- You simply don’t have one with you
- You’re in a busy location, and setting up a tripod in a crowded place isn’t an option
If any of the above is the case, follow the tips below and try shooting your HDR images handheld. I do it quite often, with a high level of success, because I follow these guidelines.
10 Steps For How to Shoot HDR Photos WITHOUT a Tripod
#1 Set your camera on Auto Exposure Bracketing (AEB) to Shoot Variable Exposures Automatically
When you’re shooting handheld and doing HDR, the fewer manual steps in between shots the better – because you’re moving. That’s why I always start by turning on AEB: your camera will automatically take a sequence of exposures (e.g., ‑2, 0, +2 stops) so you don’t have to pause and change settings between shots. Keep the number of frames small (ideally three to five) so you minimize movement and alignment issues later.
I use a Canon 5D Classic (update: used to), and this and most other Canon models allow for a maximum of 3 bracketed shots. For most scenes that is sufficient IF you shoot those images at 2 stops apart.
So you will end up shooting exposures at -2, 0, and +2. If you can set what order the camera shoots them in, choose to shoot the +2 one first (you’ll see why later).If you shoot Nikon you may find that you can only bracket in one-stop increments, so if that is the case shoot 5 images: +2, +1, 0, -1, -2 and just delete the +1 and -1 images, you really don’t need them.
Some Nikons give you the option of shooting 7 or even 9 bracketed shots, but I’d also shoot no more than a maximum of 5 images (that you will keep) total. So you could shoot, for example: +3, +2, +1, 0, -1, -2, -3 – but dump the +2, 0 and -2 images and keep the other 5.
Using more than 5 makes it tougher to get the images aligned in the processing stage because there’s more chance of you moving between the exposures, and this can result in a final image that’s not very sharp or has edge alignment issues.
So I recommend using 5 exposures maximum to create your HDR image.

#2 Set Your Camera on Aperture Priority Mode
Because you’ll be hand‑holding, consistency matters. By using Aperture Priority mode you fix the aperture and let the shutter speed vary between frames. If you let the aperture change, your depth of field shifts and focus may vary — which means you’ll fight alignment and sharpness problems later. Start here to keep things stable.
Changing the aperture from one shot to the next will cause changes in focus in the images from one to the next and will create major alignment problems, sharpness issues, and could cause really odd halos around things. For that reason, you always want to change the shutter speed only when doing HDR, this is no different.
So setting to Aperture priority mode you will make sure the aperture doesn’t change from one shot to the next. Now, having said that you also need to keep an eye on your shutter speed and see what the camera ends up shooting at, especially for the +2 or +3 shots.
That’s why I mentioned setting the camera to take the most over-exposed shot first so that you can see what shutter speed it will use to take the longest exposure – and if you will end up with a shutter speed that’s too slow to keep the image sharp.


What shutter speed is too slow?
How do you know when you’ve gone too far with your shutter speed?
What we want to avoid is what’s commonly called “camera shake“.
This is literally the camera movement caused by your hands holding it. You can’t hold the camera steady for long exposures, even if you stand really still. We have a limit, that’s why tripods were invented. But if you follow this rule of thumb it will give you an idea of how slow is too slow (as a starting point, you may be super steady or super shaky, to try with your own equipment to find your limits with your camera and lens combination) and make sure your shutter speed stays above that setting to avoid camera shake.
Ready for it?
Keep your shutter speed faster than 1 over the focal length of your lens!
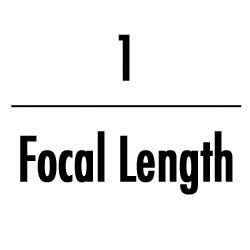
Huh?! Okay, what that means is if you are using a zoom lens at the 200mm setting, you need to shoot at 1/200th of a second or faster to keep things sharp at that focal length (200mm).
If you’re at 50mm then 1/50th will do it. The longer the lens the more amplified camera shake is, so you need a faster shutter speed to keep it sharp.
So what happens then if you set up your bracketed shots and your longest one is too long? Keep reading, we’ll put it all together shortly!
#3 Keep Your ISO Set as Low as Possible
HDR processing tends to crank up noise — especially in shadow areas — and when you’re handheld, the risk is already higher. So set your ISO to as low as you can (often 100 or 200) so you start with the cleanest base image possible. If you absolutely must bump ISO to maintain a fast enough shutter speed, do it — but accept you’ll have to do more noise reduction later.
So to minimize that, you want to keep your ISO as low as possible – ideally 100 or 200.
However, in some situations, you may not have an option but to bump it up a bit. Using the tip above, if your shutter speed on the longest exposure is falling in the 1/15th range and you simply need to get more to avoid camera shake, you have two options.
Option #1 – open the aperture on your lens to the widest or wider one (f2.8 for example).
But you may not want to do that because that will sacrifice depth of field, OR you simply may not have that option with the lens you have if its maximum aperture is say f5.6 and you’re already there.
So then there’s option #2 – increase the ISO just enough to get the desired shutter speed.
Keep in mind that if you do this your final image may require some noise reduction prior to the tone mapping process, and some more noise reduction afterward. If it’s a case of getting the image or getting nothing though – I’d probably bump my ISO and get a noisy image as my preference over none at all.
#4 Next, Brace Yourself and Get a Reference for Your Image Framing
Because you’re without a tripod, you’ve got to become your own stabilizer. Check how the scene is framed through the viewfinder (or screen), pick something in the composition you can keep aligned from shot to shot, and physically stabilize yourself: elbows in, left hand under the lens, lean on a wall or table if you can. The steadier you start, the better your exposures will align.
What’s in each corner, is there something dead smack in the center you can concentrate on keeping in the center?
Basically, you want to make sure you move as little as possible from one frame to the next to make for better, more accurate alignment later. If your camera has an option for turning on a grid inside the viewfinder, use it to keep the image aligned.
Brace yourself the best you can, keeping your elbows in tight to your body, and your left hand under the lens, not on top of it.
Breathe out and hold it, or just hold your breath.
Lean on something solid like a table or wall if you have the option. Just get as solid as possible and don’t move!
#5 Set Your Camera on High-Speed Shooting Mode or Motor Drive
You want your bracketed set to fire as fast as possible so that the time between exposures is minimal — less time, less chance of movement. If your camera can shoot multiple frames per second, even better. Hit the shutter once and let it expel your three or five exposures in rapid succession.
If your camera shoots 3 frames per second that’s good, if it shoots 10/second that’s even better. The idea is you just want to press the shutter once, let the camera rapidly fire off all 3 or 5 you’re bracketing, then release your finger. This will help minimize camera movement between frames as well.
#6 Use Your Exposure Compensation to Adjust All the Exposures
Even though you’re bracketed, you still want the whole set to land in the right exposure zone. Check your histogram for gaps on the shadows and highlight sides. If your darkest shot is still too bright, use exposure‑compensation (‑1 or ‑2) so your bracketed range shifts appropriately. It’s about maximizing clean detail across the set.
Your histogram will tell you if you have enough information in the shadow areas of the darkest image – ideally you want a gap in the histogram on the left-hand side. Likewise, on the highlight side (bright areas) you want a gap there on your darkest exposure and no “flashing” highlights that are blown out.
If you shoot your 3 bracketed exposures and take a look at the graphs but that’s not happening, let’s say your darkest one is still too bright. You can shift all 3 of the bracketed exposures down by using the Exposure Compensation setting.
Dial in -1 or -2 and the whole set will move down the scale accordingly. Shoot again and see if that set is any better. If in doubt, do a couple of options and see which process better later in the computer.
#7 Shoot it, Then Shoot it Again!
Handheld HDR is trickier than using a tripod, so give yourself a backup. After your first bracketed set, shoot the same scene again. One of them is likely to align better, be sharper, or just work more cleanly. Don’t walk away thinking the first try is good enough — do a second set while you’re still in the scene.
Usually one of them will come out better, sharper, and easier to align – often the second set.
#8 Review Your Set or Sets of Images
Before you leave the location, inspect your images. Zoom in and look for jumps between frames, blurry exposures, misalignment or focus issues. If you spot a problem, go back and reshoot while you’re still on site. Once you’ve left, you can’t fix it later.
If you scroll through them and you see drastic jumps from one image to the next in the series, you may want to shoot it again before moving one. Then zoom in on your camera to see them closer up.
Check for focus and sharpness and if there isn’t any you may need to shoot again and review your settings, particularly shutter speed. Once you leave the location you can’t fix it later, so make sure you’ve got what you want and it’s sharp before you move on.

#9 Setup Focusing
Make sure your camera is locked down: no refocusing between exposures, no changing aperture, and no wandering points of focus. Lock your focus (and exposure if your camera allows), switch off continuous autofocus, and pick a single focus point. If your camera won’t do that automatically, focus manually once and leave it. The steadier your focus across the exposures, the sharper your final HDR will be.
If your camera has an AF/AE-Lock button (most Nikons have one to the right of the viewfinder or eyepiece), set it up to lock both the focus AND the exposure. Then press it down to lock both, hold it in and then press the shutter button to take your bracketed shots.
For most Canons, they have some version of this option in custom settings (check your manual), where you can set it up to use the “* “button on the back of the camera, to lock the focus independent of the shutter release button. So you focus using your thumb on the “*” (you don’t have to hold it once it locks) and take the exposures with our index finger.
If your camera doesn’t have such a thing, you can also focus using your lens’ autofocus, then turn it off to manual.
This is a bit clunkier though and you can end up moving while you’re doing that. Another thing you want to make sure of is that your camera’s focus (AF) setting is on “single” for Nikon, and “one shot” for Canon, which ensures that the camera isn’t trying to continually focus.
Lastly make sure your camera is set to single point focusing, meaning you choose which point the camera focuses on. You do NOT want it choosing where to focus!
#10 Reducing Noise With Photo Editing Software
After you’ve captured your exposures, the work isn’t over. Because handheld HDR often involves trade-offs — like higher ISO or slower shutter speeds — your images may need more cleanup in post. Start by applying noise reduction before you merge, then refine the tone-mapped result afterward. This step is key to keeping your HDRs clean and crisp.
If you’re working with challenging sets or just want a smoother editing process, I recommend using either Lightroom or Luminar Neo’s HDR Merge extension. Both are excellent, though I sometimes reach for Photoshop for tricky handheld shots that need better alignment.
Want to see my full HDR editing workflow from start to finish? Check out my new HDR Photography Course — it walks you through both Lightroom and Luminar Neo, step-by-step.
It’s all about the workflow you develop and what works for you, this seems to work for me. If you don’t already have Photomatix, you can download a trial of Luminar Neo and use the code DPM10 to get a 10% discount when you purchase Luminar Neo.
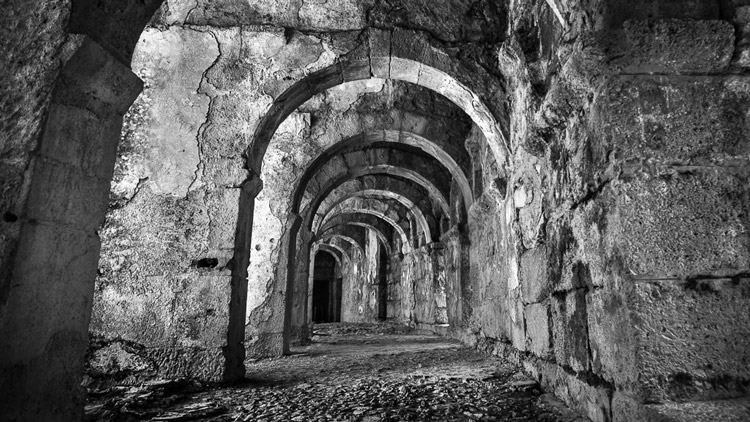
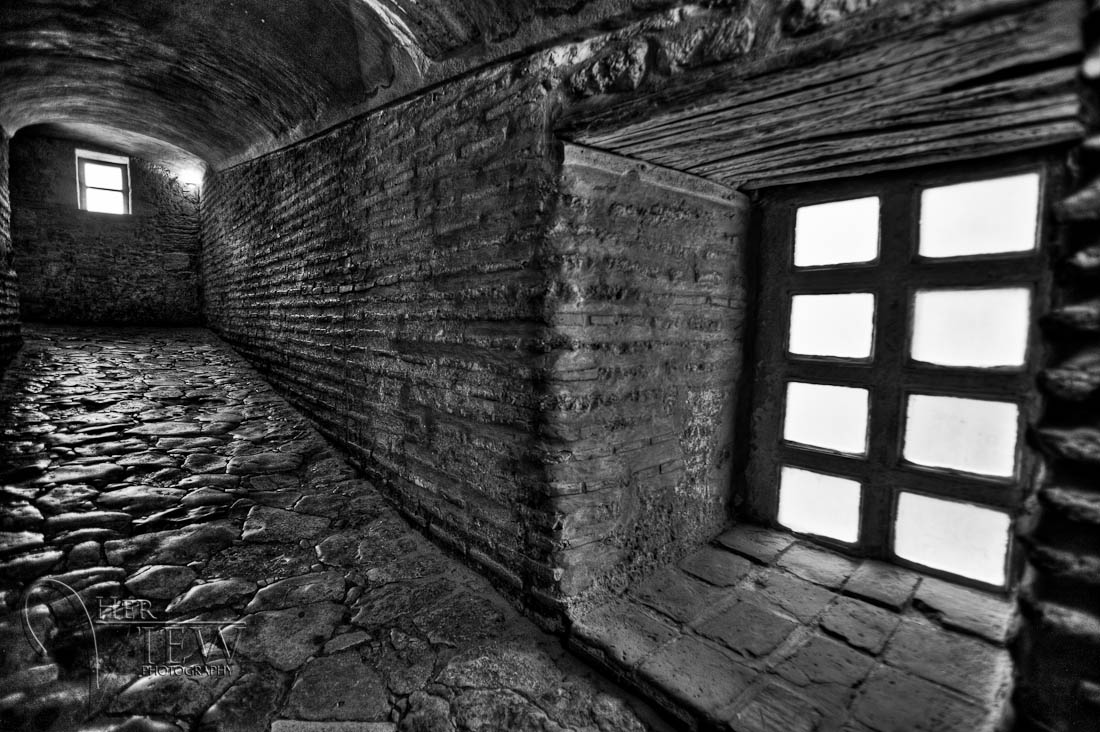
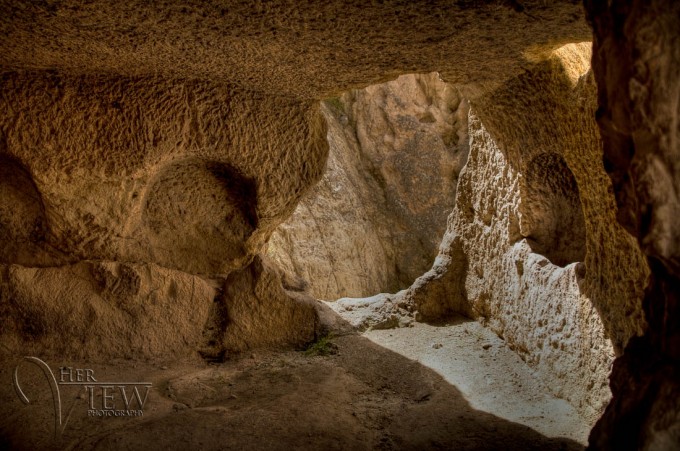
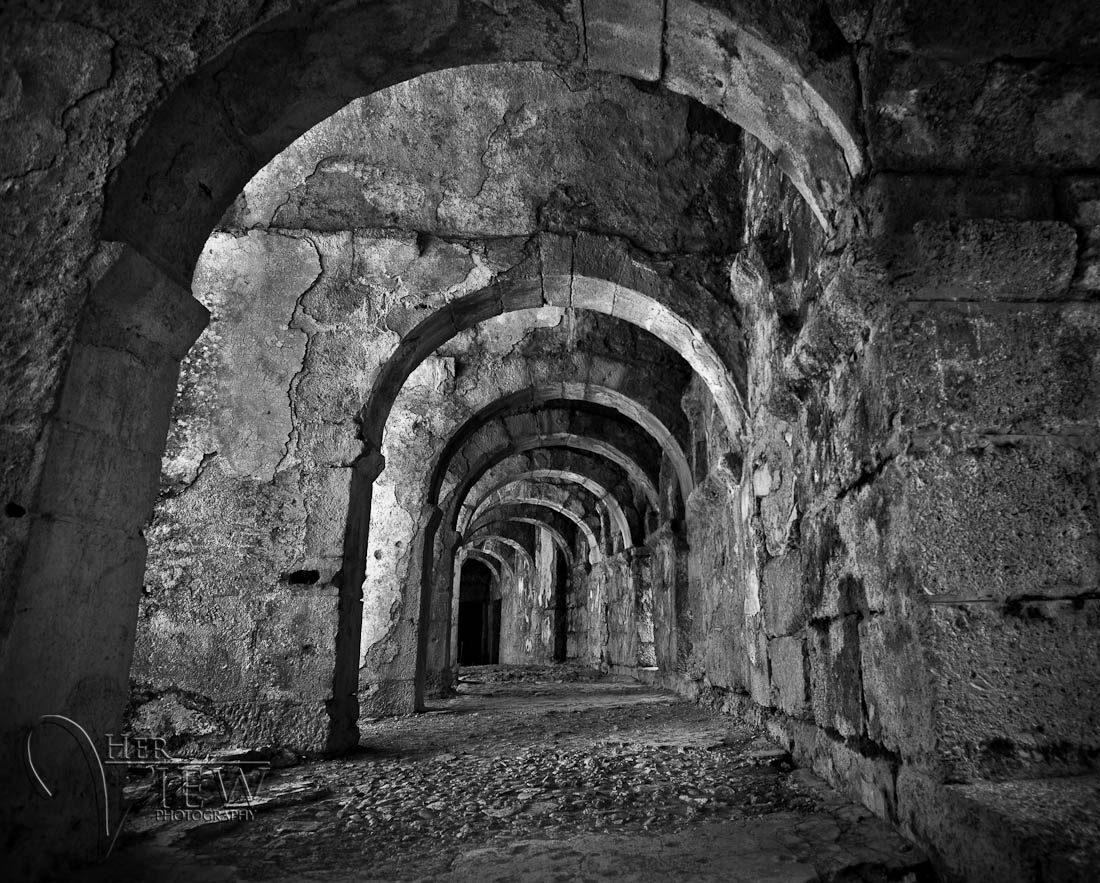
All the images you see in this article were taken in Turkey using these techniques and tips. If you want to see more images from Turkey (including non-HDR ones) in my travel portfolio. Here are a couple more HDRs done handheld.


Okay, now it’s your turn. I challenge you to go out today and start shooting some HDR handheld. Try these tips and let me know how you make out. Share a link to your photos so we can all see them too and tell me about any problems you encountered so I can help you troubleshoot them and find a solution.
Challenge part two: if you think of anything else that should be on this list please tell me by adding it to the comments section below. I want to make this site a resource for answering questions and solving problems by not just me telling you how to do it but helping each other.
Cheers,
