If you’ve ever taken a photo where the bright areas are blown out or the shadows are nothing but black, you’ve run into the limits of your camera’s dynamic range. The Merge to HDR feature in Lightroom Classic can help you capture every tone and texture in high-contrast scenes — and keep your results looking realistic. In this guide, I’ll walk you through how to shoot the right bracketed exposures, merge them in Lightroom, and fine-tune your image so it’s full of detail without losing its natural depth.
TL/DR – Quick Guide to HDR Merging in Lightroom
Lightroom’s Merge to HDR tool lets you combine bracketed exposures into a single high-dynamic-range DNG file for realistic results.
- Shoot RAW in manual mode, bracket 2 stops apart, and adjust shutter speed only.
- Import to Lightroom Classic, select your bracketed set, and use Photo Merge > HDR.
- Apply global adjustments for balance, then local adjustments for fine detail.
- HDR preserves shadow and highlight detail far better than processing a single RAW file — without the overprocessed look.
Understanding HDR and Dynamic Range
HDR stands for High Dynamic Range.
Put simply, that means the range of contrast in a given scene is high — so high in fact that your camera cannot render detail in both the highlight and shadow areas at the same time. You’re forced to make a choice of how to expose and where you keep detail — unless you use special techniques that have also become known as HDR.
For more background, check out: When you SHOULD and should NOT do HDR.
HDR as a concept has been around far longer than digital photography. Ansel Adams used the Zone System to manage tonal range in film photography. (more info)
Today, HDR has evolved past the “funky, haloed, oversaturated” phase and come back to a more natural look — which is exactly what I’ll teach here.
When HDR is the Right Choice
HDR is worth using when:
- The scene’s dynamic range exceeds your camera’s capability (think: interiors with bright windows, sunrise/sunset landscapes).
- You want detail in both shadows and highlights.
- You’re shooting static subjects (buildings, landscapes, interiors).
When not to use HDR:
- Low-contrast scenes — your camera’s native range can handle it.
- Scenes with fast-moving subjects (can cause ghosting).
- If you’re tempted to eliminate all shadows — you’ll lose depth and atmosphere.
Remember: HDR won’t fix a badly composed, poorly lit, or boring image. It’s a tool for tone control, not a magic wand.
HDR Styles: What to Avoid and What to Aim For
I’ve talked about the importance of shadows before in: 5 Tips for Using Shadows to Create Dramatic Images.
When you eliminate all shadows completely and pull them down to mid-tones, then do the same with the highlights, you end up with a mushy mess with no contrast. That’s not the point of HDR.
Example of what NOT to do:

Example of what we’re aiming for: natural, realistic tone control.

Essential Camera Settings for HDR Bracketing
(See also: HDR Photography Course – Lesson 1: Camera Settings for HDR for a complete 45 minute video walkthrough and explanation.)
Core settings:
- File format: RAW
- Mode: Manual (if tripod) or Auto Exposure Bracketing (if handheld)
- Exposure control: Adjust shutter speed only to change exposure — keep aperture fixed for consistent depth of field.
- ISO: Lowest possible (100–200) to reduce noise.
- Focus: Lock focus — manual, back-button focus, or focus lock.
- Tripod: Strongly recommended for precise alignment.
- Bracket spread: 2 stops apart for maximum range without excessive overlap.
Extra tips:
- Use histogram review and highlight warnings (“blinkies”) to check exposures.
- If your camera can’t do 2-stop bracketing, shoot more frames (e.g., 7–9 at 1 stop apart).
- For handheld, use AEB with continuous shooting to capture the sequence quickly.
Step-by-Step: Shooting Bracketed Exposures
Why 2 stops apart?
- 1 stop apart:
-2, -1, 0, +1, +2→ ~4-stop range - 2 stops apart:
-4, -2, 0, +2, +4→ ~8-stop range
Process:
- Start with your base exposure (middle of histogram).
- Adjust shutter speed in consistent 2-stop increments (six clicks on most cameras set to ⅓ stop steps).
- Capture from darkest (no clipped highlights) to brightest (no clipped shadows).
- Use your histogram and highlight warnings to confirm.
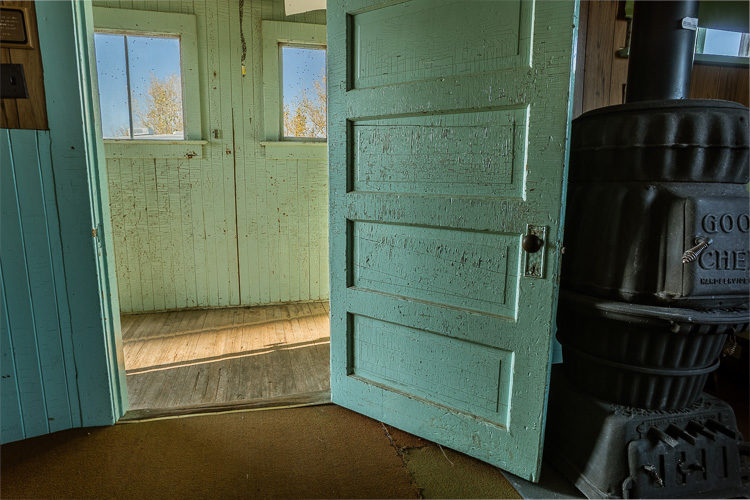
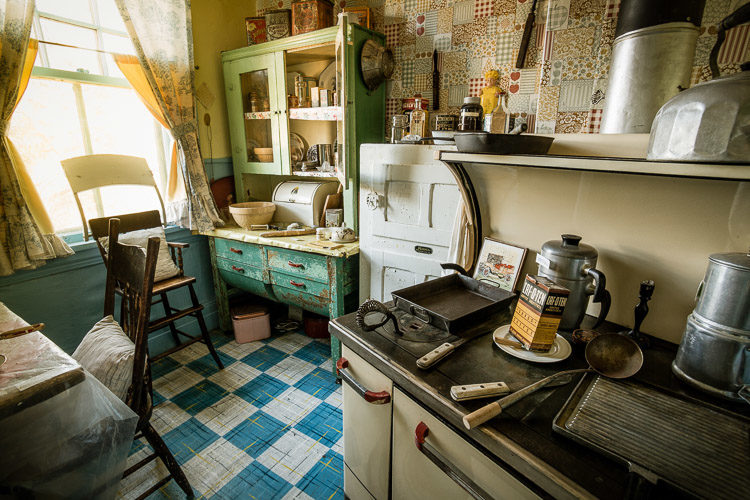
Example series (interior with windows — one of the highest contrast scenarios):


Pro tip: Take a “marker shot” of your hand between sequences so you can easily find the sets later in Lightroom.
Merging HDR in Lightroom: Step-by-Step
(See also: HDR Photography Course – Lesson 2: Lightroom Merge & Edit for a complete walkthrough with advanced tips.)
Once you’ve imported your bracketed shots into Lightroom:
Step 1 – Identify Your Sets
Use color labels or flags in the Library module to mark all bracketed images so they’re easy to find later.
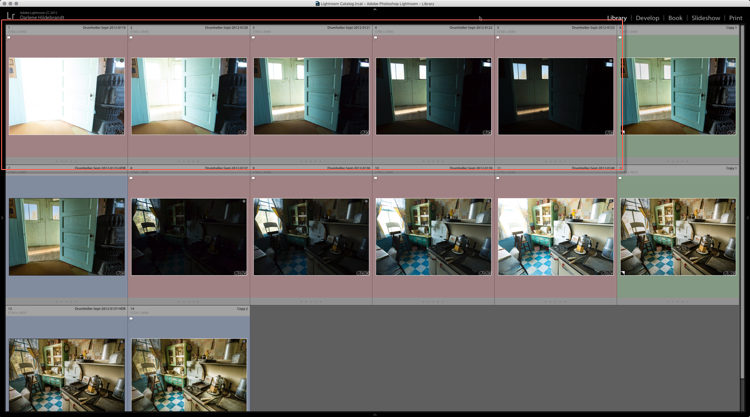
Step 2 – Select All Frames in the Bracket Set
Make sure every frame in your sequence is selected before starting the merge process.
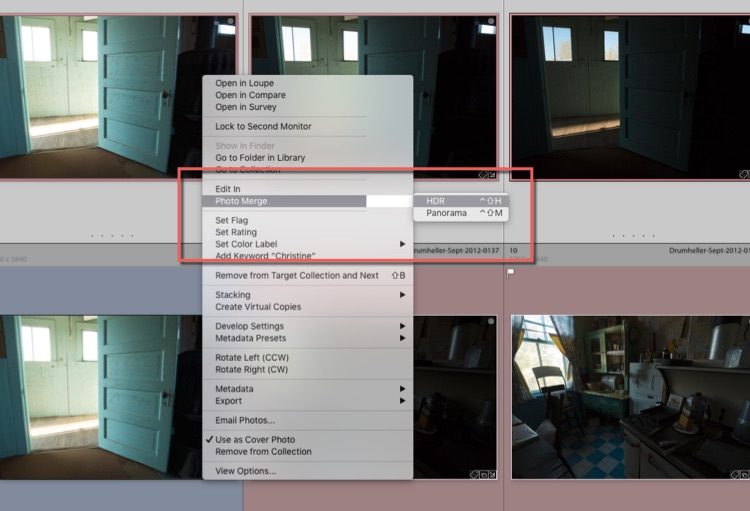
Step 3 – Open the HDR Merge Command
Right-click on the selected images and choose Photo Merge > HDR from the menu.
Step 4 – Adjust HDR Merge Preview Settings
In the HDR Merge Preview dialog:
- Auto Align: ✔ Always safe to check.
- Auto Tone: Optional — I prefer making tone adjustments manually after merging.
- Deghosting: Use only if movement occurred between shots.

Step 5 – Merge the Images
Click Merge and Lightroom will process the selected exposures into a single 32-bit DNG file with the full combined tonal range.
Want to master HDR without halos or muddy tones?
Lesson 2 of our HDR Photography Course walks you through Lightroom HDR merging with pro-level adjustment techniques.
The Power of the HDR DNG File
After merging, Lightroom imports the new 32-bit DNG automatically (check preferences if it doesn’t).
Think of it as a “super-mega file” containing all the tonal data from your bracketed shots.
You just have to massage it a bit to get it to sing!
Example:
It may look flat at first, but that’s the beauty — it’s a blank canvas for your adjustments.
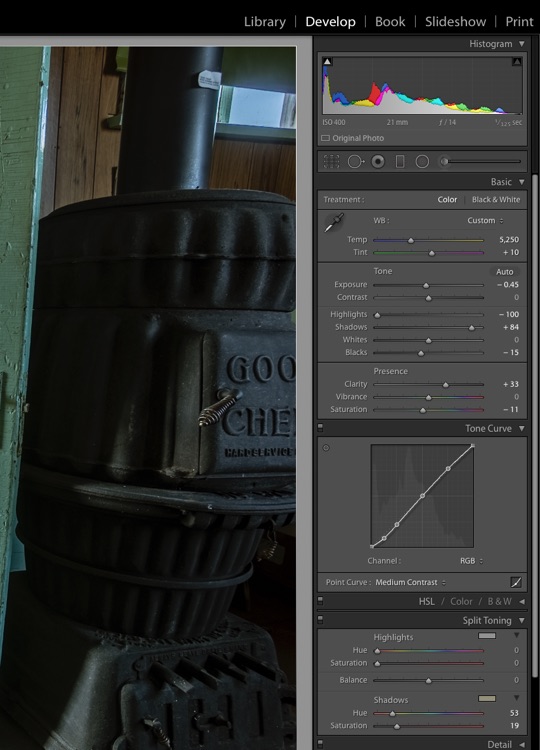
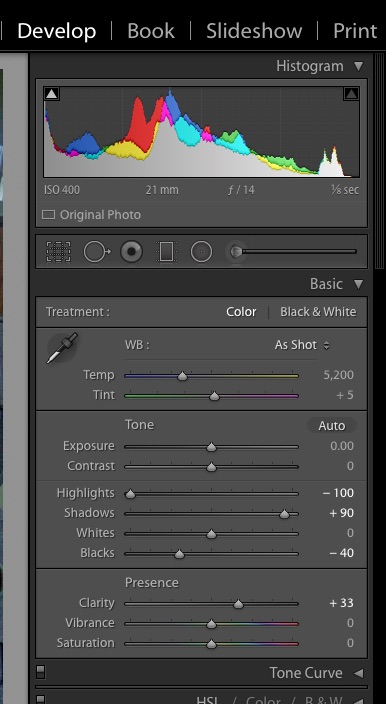
Global Adjustments in Lightroom
After merging, start with global edits:
- Adjust Exposure, Contrast, Highlights, Shadows, Whites, Blacks.
- Use Tone Curve for fine contrast control.
Example after global edits:
Local Adjustments for Maximum Impact
Once the global balance is set, fine-tune with local adjustments:
- Pull highlights in bright windows.
- Lift shadows in darker corners.
- Add clarity or texture to enhance detail.
- Use radial/grad filters for subtle light shaping.
Example after local adjustments:
Tip: Resist the urge to overdo local adjustments — natural depth comes from retaining some shadows and highlights.
HDR vs Single RAW File Processing
To compare, here’s what happens if you try to recover the same range from a single RAW file:
Single RAW processed:
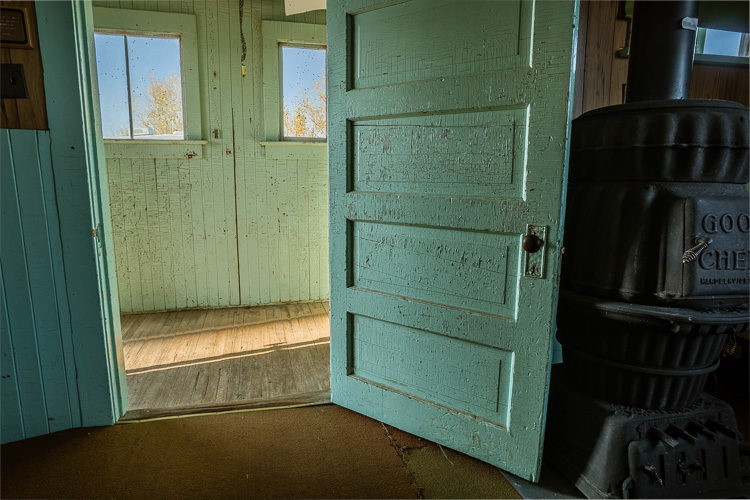
5 Images combined using Merge to HDR in Lightroom
If you must know, these are the settings I used on the single raw file. No local adjustments were applied.
Detail & Noise Comparison at 100%


Comparison Table:
| Feature | HDR Merge (5 brackets) | Single RAW File | Photomatix HDR |
|---|---|---|---|
| Highlight Detail | Excellent | Lost/muddy | Good |
| Shadow Detail | Excellent, low noise | Recoverable but noisy | Good |
| Editing Flexibility | High (32-bit DNG) | Moderate | Moderate–High |
| Natural Look | High (if processed carefully) | Natural but limited range | Variable (depends on preset) |
Another Example & Alternative Methods
Example: set of bracketed images in 4 exposures at ISO 100, f/11

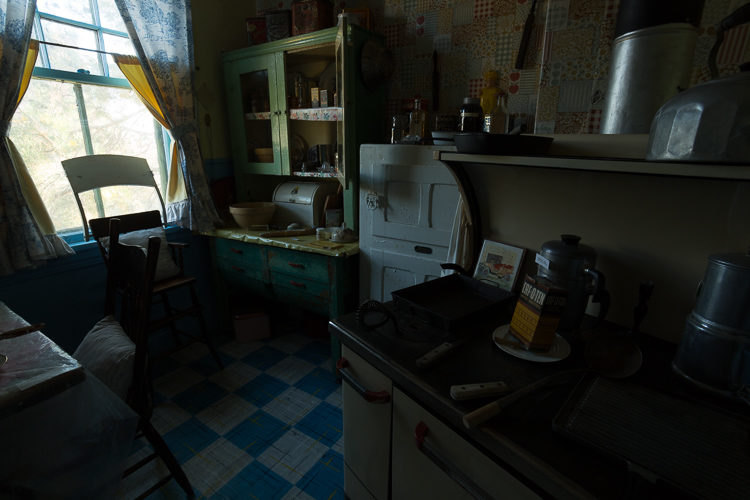


Single RAW version (notice muddy windows):

Graduated filter enhancement for glow:
Alternative software: Photomatix — offers more stylistic presets but can introduce halos or unnatural tones.

Learn HDR Photography the Right Way
Ready to capture every tone and detail in your images?
Get the complete process — from camera settings to final edit — in our HDR Photography Course including editing HDR photos with both Lightroom Classic and Luminar Neo
FAQs About HDR in Lightroom
What’s the best way to shoot bracketed exposures for Lightroom HDR?
For the cleanest HDR results, shoot in RAW format, use manual mode, and adjust shutter speed only. Bracket each exposure 2 stops apart to maximize tonal range.
- Keep ISO low for minimal noise
- Use a tripod for precise alignment
- Lock focus so it stays consistent between shots
Do I need to use deghosting in Lightroom HDR?
Use the deghosting option only if there’s movement in your scene, such as leaves blowing or people walking. For still subjects, leaving it off produces a cleaner HDR DNG file with fewer artifacts. Always review the preview before committing to the merge.
How many images should I use for HDR merging?
Four to five bracketed exposures at 2-stop intervals usually cover the entire dynamic range without adding redundant frames. Shooting more images increases processing time and file size but doesn’t necessarily improve tonal detail if your exposures already capture both shadow and highlight extremes.
What’s the difference between HDR in Lightroom and Photomatix?
Lightroom’s Merge to HDR creates a 32-bit DNG file with natural tone mapping and full editing flexibility in the Develop module. Photomatix offers a wide range of stylistic presets, which can create artistic results but sometimes produce halos or an overprocessed look if not used carefully.
Why not just process a single RAW file instead of HDR?
A single RAW file holds less tonal data, so pulling detail from both shadows and highlights often increases noise and reduces clarity. HDR from bracketed exposures retains detail in all tonal areas, allowing for cleaner edits and a broader dynamic range without sacrificing image quality.
Cheers,
