Master Natural HDR Editing with Lightroom Classic’s Built-In Merge Tool
Learn how to merge bracketed RAW exposures in Lightroom Classic and create high dynamic range images that look clean, balanced, and realistic—without the overprocessed HDR look.
Why use Lightroom’s HDR Merge Tool?
If your HDR edits look flat, overcooked, or are confusing to work with, you’re not alone. Lightroom’s built-in HDR Merge tool is powerful—but often misunderstood. This lesson shows you how to use it properly to get consistent, natural results from your bracketed photos.
You’ll learn what each setting does—Auto Align, Auto Settings, DeGhosting—and how to avoid the most common Lightroom HDR mistakes that many photographers make.
What you’ll learn in this lesson
If you’ve ever felt confused by Lightroom’s HDR Merge feature—or underwhelmed by your HDR results—this lesson shows you exactly how to merge bracketed RAW exposures the right way. You’ll learn about ghosting and how to avoid it, how to preserve tonal range, and you’ll discover how to use Lightroom Classic to create clean, natural-looking HDR images with full editing flexibility.
- How to merge bracketed RAW photos using Photo > Photo Merge > HDR
- What the Auto Align and Auto Settings do and when to use them.
- How to use DeGhosting to fix motion blur from clouds, people, or trees.
- Why your merged HDR image looks flat (and how to fix it).
- How Lightroom’s HDR Merge differs from plugins like Luminar Neo or Photomatix.
- Where to find your merged HDR DNG file and how to start editing it.
- Editing tips to keep your HDR results clean and natural-looking, not crunchy or fake.
- Adjusting the contrast, whites, blacks, and clarity for balanced tonal output.
- How to read the Lightroom histogram and fine-tune the dynamic range.
- Export tips to avoid washed-out results or dim web images.
Common Lightroom HDR Questions Answered
Here are just some of the questions this lesson will help you answer:
How do I merge bracketed photos in Lightroom Classic?
You’ll follow a step-by-step walkthrough that shows how to merge bracketed RAW files (you can shoot and merge JPGs but ideally you want to shoot RAW format) using Lightroom’s HDR Merge feature. From selecting the right images to choosing merge settings and locating the HDR DNG output, this lesson explains the full process with practical tips you can apply right away.
Why does my HDR look dull after merging in Lightroom?
Many photographers expect bold results, but Lightroom produces subtle, flat-looking HDRs by design (especially when you use the Auto Settings option). This lesson explains why that happens and shows you how to edit your HDR DNG properly to recover tonal depth, increase contrast, and enhance the image—without overprocessing or losing the natural feel.
What’s the difference between HDR Merge and HDR Panorama?
When merging bracketed images for tonal range, use HDR Merge. When stitching a scene width and merging for HDR at the same time, use HDR-Pano. This lesson clarifies which tool to use based on your shooting goals, and why HDR Merge is ideal for bracketed exposures, even if Lightroom gives both options in one menu. HDR-Pano is covered in another lesson in this course.
How do I fix ghosting in Lightroom HDR merges?
If your scene includes movement, like wind-blown trees, flowing water, or people, then ghosting could ruin your result. This lesson shows how to use Lightroom’s Deghosting feature, what each level means, and how to preview ghosting masking before merging, so you avoid blur and preserve critical details.
What are the best HDR settings in Lightroom Classic?
Settings like Auto Align, Auto Settings, and Deghosting can be confusing at first. This lesson explains what they do, how to use them based on your scene, and which settings to disable if you want more manual control over your HDR editing process in Lightroom Classic.
Why does my HDR DNG look flat compared to single RAW edits?
HDR DNGs preserve more dynamic range but may look lifeless until properly edited. This lesson shows why that’s actually a benefit—and how to bring the image to life using the Highlights, Shadows, Whites, and Blacks sliders in Lightroom’s Develop module, starting from a clean, flexible base.
How do I make HDR images look natural in Lightroom?
This lesson teaches a natural HDR editing approach—focused on subtle adjustments and tonal balance. You’ll learn how to avoid crunchy textures, neon colors, and overdone contrast while still enhancing the detail in skies, shadows, and midtones for a polished but realistic final result.
What’s the purpose of Auto Align and Auto Settings in HDR Merge?
Auto Align corrects slight shifts or camera movement between bracketed frames, while Auto Settings applies basic tonal adjustments. This lesson explains how and when to use these options, why they’re helpful for some photos, and when you might want to skip them for more editing flexibility post-merge.
Can I apply masks to Lightroom HDR DNGs?
Yes, you’ll see how HDR DNGs behave like standard RAW files in Lightroom. This lesson will show you how to use masking tools on your merged image for targeted adjustments, such as sky darkening, shadow lifting, or selective contrast. That will help you refine the edits without affecting the whole frame.
Why is my HDR merge taking so long in Lightroom?
Large RAW files, high bracket counts, or older hardware can slow HDR merges. This lesson explains how Lightroom processes HDR images, why it might lag, and how to speed things up by limiting exposure sets, closing background apps, or merging in batches strategically.
This lesson is perfect for you if…
- You’ve tried HDR editing in Lightroom, but your results look dull or muddy.
- You want a natural-looking HDR workflow that starts with clean brackets.
- You’re overwhelmed by HDR plugins and want to stick with Lightroom Classic.
- You shoot interiors, landscapes, or high-contrast scenes regularly.
- You want to avoid ghosting, color issues, and file confusion during the HDR merge.
See how it’s done – then try it yourself
Watch the full step-by-step tutorial, and follow along with the included RAW bracketed files inside the course. You’ll get hands-on experience merging, editing, and producing HDR photos that are clean, vibrant, and true to life.
Download the RAW practice files
The RAW bracketed HDR files mentioned in the video are only available for students enrolled in the course.
NOTE: If you are a student and do not see the download link below, you need to log into your DPM account (do that here )
Want to Learn the Full HDR Workflow?
This is just one part of our full course: How to Do HDR Photography the Right Way — where you’ll learn how to capture bracketed exposures, edit them in Lightroom or Luminar Neo, and avoid the classic HDR mistakes most photographers make.
Get access to the complete HDR Photography course.
Live photo editing demonstrations
If you attend our weekly photo editing Livestream on YouTube you can also ask Darlene questions there. She will answer them and demonstrate the solution live.
We broadcast live for 60-90 minutes every two weeks on Sundays at either 2:00 pm or 6:00 pm EST (alternating after each session). Darlene edits subscriber-submitted images using Lightroom, Luminar Neo, and Photoshop. It’s a great way to learn some new skills, pick up some tips, and get inspired to edit your photos. Come ask some questions and join in on the conversation.
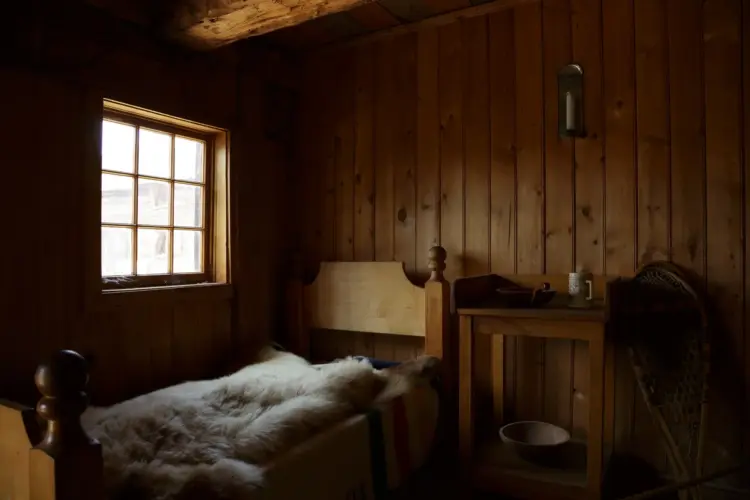
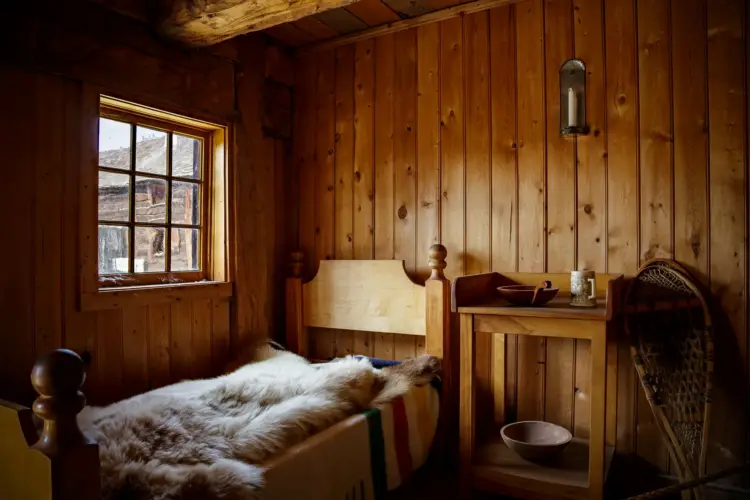
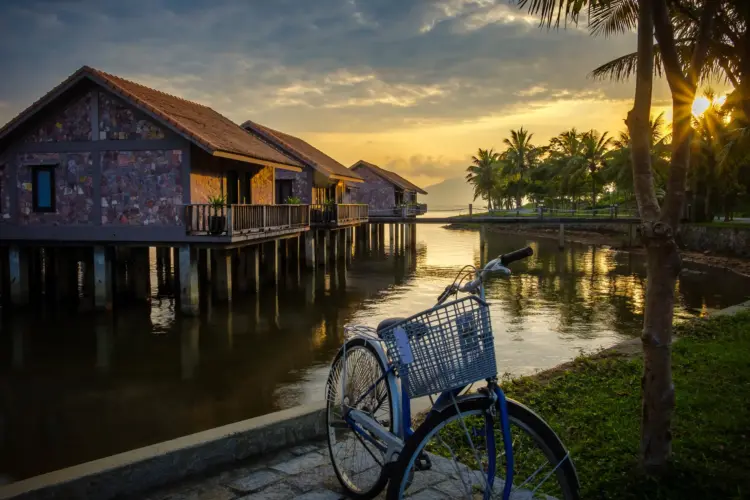
After images for reference
Below are the finished images that I created in the video above. Use them as a reference and try and replicate the results or get as close as possible.
We encourage you to share your finished images in the DPM community to get feedback and create a discussion with other course students.